Friday, 18 April 2014

What's In My Make Up Bag

I'm trying something a little bit different today and writing my first beauty post! I don't know a lot about beauty and I unfortunately do not own an excessive amount of products. However, I do love reading beauty blogs and watching beauty Youtube videos. So, here is a look into my make up bag, which appears to be overpopulated with lip products and doesn't include the three nude lipsticks that have taken up residency in my hand bag. 


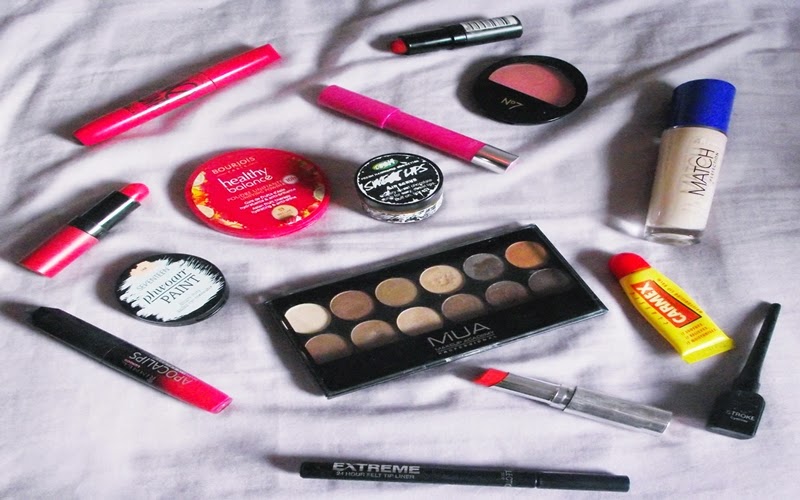
Rimmel Match Perfect Foundation: I've been using this for a few months now and I absolutely love it. I wouldn't recommend it if you're looking for a  high coverage foundation as it's definitely very light but it gives me just enough coverage to even out my skin tone, which is all I'm really looking for. It's also the perfect shade for my pale skin, I have this in the shade "Porcelain".

Boujours Healthy Balance Powder: This is an old favourite of mine. It's not chalky and doesn't leave your make up looking cake-y, perfect for setting my foundation and giving a little bit more coverage.

SEVENTEEN Phwoarr Paint: I find that the only part of my face that needs a lot more coverage is under my eyes. I never seem to be able to find a concealer that doesn't disappear as I'm blending it in. However, this one is extremely heavy duty, but not drying as you would expect, it's surprising creamy.

No7 Blush: I've had this blush for far too long, I only sweep a tiny bit over my cheeks as they're quite rosy naturally. I don't even think Boots sell these anymore but it's such a nice colour and it does the job so I refuse to throw it away.

Collection Fast Stroke Eyeliner: I use this when I want quite thick, very black winged eyeliner. This will not create a thin line unless your hands are reeeeeeally steady (which mine are not) but it's extremely opaque and amazing for less than £3/€5. 
Collection Extreme 24h felt tip liner: When I first bought this, it seemed like it had already become very dried out so I rarely used it. However, I've heard a lot of people rave about this eyeliner lately so I thought I would give it another go and I'm really glad I did. Not completely opaque like the one I mentioned above but it's great for creating a thin, small line.

Collection No Clumps Mascara: Not much to say about this one. It does what it says on the tin really, no clumps! Really great for lengthening and separating the lashes.

MUA Heaven And Earth Palette: The only eyeshadow you will find it my make up bag is this palette. It's all you need really, it has a great range of neutral colours, which is perfect for me. I only wish it had some matte shades.

Rimmel Kate Matte Lipstick in 110: I don't wear lipstick a lot but I cannot wait to use this more in the summer. It's such a beautiful, bright coral colour.

Rimmel Kate Lasting Finish Lipstick in 01: I adore this colour, deep reds are my favourite. I wish I had the courage to wear it more.

Rimmel Apocalips in Apocoliptic: These were raved about in the beauty world this time last year, I completely agree with the hype around them. The colour range is fantastic and they really stain the lips.

No7 Sheer Temptation Lipstick in Cuckoo Coral: I got this lipstick when I had a no7 voucher last year. It adds the perfect sheer coral tint to your lips but I don't think I would pay €12.75 for it at full price.

Revlon ColourBurst Balm in Lovesick: I wore this last week and fell in love with this vibrant pink lipstick again. Stays on all day with minimal fuss and keeps my lips super moisturized.

Lush Lip Scrub in Sweet Lips: This is my saviour when my lips are dry. Scrub-a-dub-dub my lips with this stuff and it gets rid of all the dead skin to make my lips lipstick ready. The sweet lips version that I have has been discontinued unfortunately but all the other ones smell just as good.

Carmex Lip Balm: I apply this every day after the lip scrub, it's the only lip balm that keeps my lips properly moisturized.


If you've made a "What's In My Make Up Bag" post, leave a comment down below and tell me, I'd love to have a nose in your make up bags! 


Wednesday, 16 April 2014

Gingerbread Men

Do you guys have a favourite baked treat that you will make and eat all of them by yourself? Well, I do and these gingerbread men are the baked treats in question. Most of them time when I bake biscuits or cupcakes, I won't eat them, I'll try one just to make sure they taste good but other than that I rarely feel the urge to eat more than one or two. However, with these biscuits it's a completely different story. This recipe makes about twelve and I will sneak at least half of them up to my room before letting my family know they are ready. I have always loved gingerbread men, ever since I was little they will be the only thing I will ever get from a bakery. This recipe might seem a bit winter-y due to the cinnamon and ginger but I really couldn't wait until the colder months to tell you all about it. I use this recipe, I find it's the best one out there. The biscuits don't come out really hard like they would with other recipes, they're super moist. Obviously this depends on how thick you choose to make them, I've found that rolling the dough out to about a 1cm thickness works best. If you and your families are anything like me and mine, these gingerbread men shall be gone within a few days. Happy baking!


What you will need: 

350g plain flour
125g butter
175g soft brown sugar
1 egg 
4tbsp golden syrup 
1tsp bicarbonate of soda
2tsp ginger
1tsp cinnamon


1. In a large bowl, sift in the flour, bicarbonate of soda, ginger and cinnamon.

2. Rub in the butter until the mixture resembles breadcrumbs, then stir in the sugar.

3. Beat the egg and golden syrup together, add these in and mix together with your hands until the mixture comes together. 

4. Put your dough onto a floured surface and begin the knead until it is smooth. Wrap in clingfilm and leave in the fridge for 15 minutes. 

5. Preheat the oven to 180C/350F/Gas Mark 4. Prepare two baking trays with parchment paper. 

6. Take your dough out of the fridge and roll out to a 1cm thickness. Cut out your gingerbread men shapes and place onto the baking tray. 

7. Place in the oven for 10-12 minutes, making sure the sides don't overcook (a mistake I made with this batch). Leave to cool on a wire rack. When cooled, decorate as desired! 


Saturday, 12 April 2014

Homemade Jammie Dodgers

These biscuits may just be the best thing I have ever made. Jammie Dodgers are a really old favourite of mine, I could in a whole packet in one sitting, (no shame, they're undeniably delicious) so when I saw this recipe in a magazine before Christmas I knew I had to make them. Even if it took me until April. They do take a bit of time if you don't have little heart or circle shaped cutters to cut out a piece in the middle but the two and a half hours I spent making them were well worth it. I used  the tip of a knife to cut out the little heart shape but I'm sure if you can find something in a little circular shape, that would work just as well and probably cut down the preparation time by a whole lot. Strawberry jam was my filling of choice but you can use whatever kind of jam you would like, seedless or not, I've found that doesn't really matter. I was pleasantly surprised to find that the jam stuck the two biscuit pieces together really well, I honestly thought they would fall apart and a jammy biscuit-y mess would ensue while eating. They look absolutely adorable and I really couldn't decide if I wanted to just stare at them all evening or gobble them all up in one go. This recipe makes 18 Jammie Dodgers. Happy baking!


What you will need :
250g butter
360g plain flour
130g icing sugar
1 egg yolk
1tsp vanilla extract
3tbsp milk
30g caster sugar, for sprinkling
150g jam of your choice


1.  With an electric mixer, mix together the butter and icing sugar in a bowl until pale and fluffy. 

2. Add your egg yolk and vanilla extract and beat together with a wooden spoon.

3. Sift in your flour and mix into a firm dough. If you find the mixture isn't sticking together add a tablespoon of milk but no more than 3.

4. Work the dough into a smooth ball with your hands, then wrap in clingfilm and pop in the fridge for half an  hour.

5. Preheat your oven to 180C/350F/Gas Mark 4 and line two baking sheets with baking parchment. 

6. Place your dough on a lightly floured surface and roll out to be about 3mm thick. Cut out an even amount of circles using a 4cm biscuit cutter, then cut out a heart/circle shape in the middle of half of them. 

7. Put the biscuits on your baking sheet and place in the oven for 10 minutes, until they're golden.

8. Transfer the biscuits onto a wire rack to cool.

9. Once the biscuits have completely cooled, sandwich them together with a teaspoon of jam. Making sure you place a biscuit that has a hole cut out on top of one that doesn't. Sprinkle with caster sugar to finish! 


Saturday, 5 April 2014

Lemon Cupcakes with Lemon Frosting

These lemon cupcakes are super zesty and make the perfect homemade baked treat for Easter. They're simple to make and a really yummy way to use up any lemons left over from pancake day, I don't know about you guys, but we still had some. The icing is optional, these cupcakes are really moist anyway but it does add an extra bit of lemon-y goodness. Happy baking!

What you will need:
125g self raising flour
125g butter
125g caster sugar
3tbsp milk
2 eggs
1tsp baking powder
1tbsp lemon juice
1 zest of lemon

For the icing:
75g butter
175g icing sugar
1 zest of lemon
3tbsp lemon juice

1. Preheat the oven to 180C and line your cupcake tin with cases, this recipe should make 12 cupcakes.

2. Mix together your butter, sugar and eggs.

3. Add your flour, baking powder and then your milk to loosen the mixture.

4. Lastly, mix in your lemon zest and juice.

5. Fill your cupcake case with a tablespoon and a half of mixture.

6. Bake for 20-25 minutes, or until your knife/skewer comes out clean.

7. While your cupcakes are baking, make your icing by mixing all of the ingredients together. If the mixture is too runny, add more icing sugar. 

8. Make sure your cupcakes have completely cooled and then ice them with your butter cream frosting.


I think some little edible flowers or mini eggs would look so cute on top of these. Drizzling some lemon curd on top could also make a yummy addition to these cupcakes! 


Tuesday, 1 April 2014

Pear and Banana Bread

Banana bread was the first thing I ever baked, by myself, from scratch. I baked a loaf every week for a couple of months, until my family got sick of it. However, this week, I brought back the banana bread, with a twist that made it even more delicious. My mother had been pestering me for the past week about baking something using the pears she had bought (and not eaten due to the fact that she couldn't get a good grip on them because of her dentures, sorry Mum) a couple of weeks back. I spent an evening look for a recipe to use the pears in only to find mainly puddings rather than cakes, which wasn't what I was looking for. I thought back to my old favourite, the banana bread and wondered if by substituting some of the bananas for pears it would work as well. I can happily say it worked so perfectly, I surprised even myself! The pictures in this post are awful quality, I apologize for that. I honestly didn't think this would work as well as it did. My first taste of this bread made me sure that I had to share this recipe. This recipe makes two loaves but it's pretty easy to half the ingredients if you just want one. Happy baking!

What you will need:
2 bananas
6 pears
450g self raising flour
225g white sugar
225g brown sugar
225g butter
80ml milk
4 eggs
2 tsp vanilla
2 tsp ground cinnamon 
2 tsp ground ginger 
50g walnuts 

  1. Preheat the oven to 180C. Grease two loaf tins with some butter and line the base with baking parchment.
  2. Chop up your bananas and pears into chunks and then mash them together.
  3. Mix the dry ingredients together in one bowl.
  4. Beat together the eggs, milk, butter and vanilla.
  5. Add the wet ingredients to the dry ones, and mix together
  6. Then add the pears and bananas.
  7. Pour the mixture into your tins and bake for an hour, or until your skewer/knife comes out clean.  Transfer your bread to a wire rack and allow to cool. Enjoy!

Tips: Make sure your pears are soft and ripe, you don't want chunks of pear in your bread!
The cinnamon and ginger are very noticeable in the bread so if you would rather they weren't add one teaspoon of each, instead of two!